Saturday, October 25, 2008

Diaper Making Take Two


Thanks to the chick with the needle for giving me the pointer on how to sew straight. She told me to align my fabric with the foot. That really helped me a lot!

The diaper isn't the prettiest thing in the world, much like the kite shirt; but I made it! I struggled with the back elastic. I was kind of confused about how to do it, but I got it figured out well enough, I guess.


Some of my fabric got caught in stitches it wasn't intended to get caught in. There are some flaws, but I think the diaper will be functional. Oh, and I definitely intend to get a snap press! I don't like sewing hook and loop. Also, the placement of my hook and loop is off. I should have double checked it before I put it down.

I used suedecloth on the inner and a cotton fabric on the outer. I used three layers of microterry for the soaker.

Diaper Making Take One


As I mentioned, I attempted to make a diaper for my younger daughter. I traced a one-size fitted diaper, but I didn't do my stitch placement well. I lost a lot of size. Also, my soaker is at the top of the diaper, so I can't stitch it closed without chopping it off.

Here's the inside of the diaper. I used red thread because I didn't have white, but I kind of like it because it enabled me to see my stitches easily. See how badly I did? ;)


And the diaper looking like a diaper. I didn't mess with doing hook and loop or back elastic.

Friday, October 24, 2008

Know When To Fold 'Em

I'm not giving up. Not on day one of my blog! I had cut some pieces for a fitted diaper the other night. I made my pattern by tracing a one-size diaper onto a piece of interfacing. Then, I cut my fabrics (old flannel receiving blanket and the rest of the red bubble fat quarter from the kite shirt) and chose my soaker. I cut up an old microterry insert and wrapped it in an old flannel receiving blanket - so three layers of microterry and two layers of flannel.

Tonight, after excitedly reading a friend's tutorial on making an all-in-one (AIO) diaper, I tried to sew my pieces together.

Sadly, I have realized I have a difficult time sewing a straight line and imagining my seam allowance. So, for the time being, I will need to figure out a way to transfer some dots or something to my fabric so that I can follow the dots as I feed the fabric through. I lost a lot of size because of my stitch placement.

I'll post photos of my diaper tomorrow. And I'm also going to still try it on my younger daughter in the morning to see if it would still fit, but I really don't think it will. I haven't put in back elastic or hook and loop yet. I didn't want to waste my supplies if it is really not going to work.

But, I will be trying again!

Thursday, October 23, 2008

The Kite Shirt


Having children has made me do things I never imagined before. Things like childbirth. Picking cribs. Pureeing peaches and peas. And making a kite applique for a 3T tank top. You see, my toddler had her heart set on a zoo party for her birthday. Our guest list was originally a little bit high for what the zoo could allow, so we had to figure something else out. We decided on a picnic and kite flying. She decided she wanted to wear her red and purple pettiskirt (her "gown"), so I decided to make something cute for her to wear with it.

At least, in my mind it was cute. And, you know, it isn't that bad. For a first timer, it isn't the worst thing ever. I wouldn't pay someone for this, but I made it for my child! I started by asking some local mom friends if it was as easy as I thought it seemed. They assured me that it was.

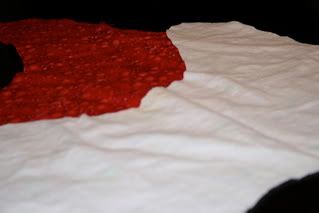
I bought four fat quarters, red thread, ric rac, wonder under and some stabilizer. First, I cut strips off the fat quarters and sewed them together. Then, I pressed the fabric to the wonder under. Wonder under, for other newbies, is an interfacing that allows one piece of fabric to stick to another. Then, I figured out the size of the kite I wanted and made a pattern out of computer paper. I traced it onto the wonder under and cut it out. Then, I accidentally forgot to peel the backing off the wonder under and tried pressing it again. So, that's what the ink mark on the right hand side of the photo below is. Oops.

After I remembered to peel the backing, I tucked the ric rac under and pressed it again. Then, I pinned the stabilizer to the inside of the shirt. The stabilizer was supposed to keep the shirt from stretching and pulling as I sewed. I did my zig zag and accidentally stitched the shirt to itself. Oops. I ripped out the stitches (with my seam ripper!) and started over. Obviously, my stitches are not even or very pretty. And you can see in one spot where the shirt wrinkled and I made a pucker. Oops. When I tried to rip the stabilizer out after I was done sewing, I ended up ripping some stitches, too. Whoopsie.

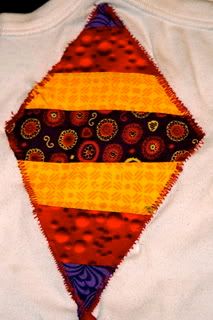
I consoled myself by saying, "It only has to be worn for the party. It doesn't matter that it isn't the prettiest thing, either, because she'll love that it is a kite shirt." If I were doing it again, I'd take my friend Jackie's advice and press the edges under themselves to create a faux seam before applying the wonder under to the applique. That would seal the edges underneath so it wouldn't fray and would enable me to do a prettier stitch than a zig zag. So, here's a close up of the finished product.


Oh and for those wondering how the kite shirt went over... She loved it so much that she put it on well before the party. And like the other things, something else happened that I never imagined I'd deal with. It, too, sort of goes along with motherhood. The shirt was a casualty to a potty training accident. She didn't get to wear it for the party. Instead, she wore her backup plain white tank. Oops.

My First Project


As I mentioned in my "Hello World" post, my first project ever was a burp cloth. Really simple straight stitches, right? Sew a rectangle and then up the folds, right? Who could mess that up!


Well, as you can see in the above photo, there is a raw edge with threads loose and stuff. Like I said, it works great and is incredibly soft. It just isn't pretty. If I were doing it over again to gift, I'd pick a prettier flannel for one thing. But I was recycling! But, really...I'd have turned and topstitched it.

Starting Out

When I mentioned to my mom that I wanted to start learning to sew, she excitedly offered me my great grandmother's machine. She recommended that it be cleaned and serviced before using and said it had its own cabinet. When we brought it home, I looked at it and was pretty intimidated. The machine looked like it could do a nice zig zag right through my finger.


I searched around for info on the machine. Who could work on it for me? What would it cost? Was it safe to use? It had been converted somehow, but I don't know how. I stumbled upon a message board for people with old sewing machines. I posted about my machine and was advised to seek out someone incredibly knowledgeable or else it would be dangerous to use.

That wasn't a whole lot of help to me. And I didn't want something dangerous. So, I bought a new machine. I went to JoAnn Fabrics and got the cheapest machine I could find. Knowing myself, I was worried I might not actually take to the craft. So, I didn't want to invest in a really great machine when a simple one would do. I decided to honor my great grandmother, so my new machine sits on top of the cabinet that the old one is in.


And then, I had to learn how to thread it. That part came with the help of a friend who came over one evening. She threaded it for me, wound the bobbin and placed the bobbin. Then, I didn't touch it for awhile for fear of messing it up. I did eventually run a straight stitch on an old pillowcase and messed up the threading. Eventually, I learned how to do it myself. Or, at least with the help of my husband.

Hello World

I've had a sewing machine since Christmas of 2006. The intention was for me to learn how to sew diapers or wipes to sell in a local diaper shop. That never happened and the machine just began to collect dust.

After the birth of my second child, aka the spit-up queen, I dusted my machine off. Well, my mother in law did. She altered the amazingly beautiful crib bedding she made for my daughter on my machine. The same crib bedding I had had lofty intentions of making myself, but obviously never did. My poor child.

Later, I picked up an old receiving blanket and a crummy Gerber prefold that is useful for pretty much nothing other than catching spit-up. I decided to stitch the blanket to the prefold so that the prefold would be softer on my baby's face and more absorbent. The resulting creation was anything but pretty, but it was functional!

I haven't done much since that project, but this blog will track what I do make and will allow for reflection on what I could have or should have done differently. I welcome constructive criticism and advice. I will also provide what will hopefully be humorous anecdotes related to learning to sew. I have never had a single lesson, by the way. If I use a tutorial for instruction, I'll link to it. Otherwise, what I've done is all on me.